Straw Bale Building
Straw bale building was first developed in America during the 1800's and is a technique that is rapidly gaining popularity today. Building with straw bales can be easy, cheap and fun. It is also a way to make a superbly energy efficient building. Conventional construction methods use vast amounts of energy, producing over half of all greenhouse gasses and involve toxic and pollluting materials. By contrast, straw is a natural material of which we currently produce an excess sufficient to build half a million homes each year. Straw is highly insulative, giving heat savings of up to 75% compared to a conventional modern house. Straw bale walls have excellent load bearing capacity and are quite suitable for two storey houses with all mod-cons.
Straw bales can be used either for load bearing walls (which hold up a roof or next storey) or infill (with separate support eg. a timber frame). In either case the bales are stacked like giant bricks and secured to each other with wooden stakes. These stakes can be hammered through the bales or tied in pairs on opposite sides of the wall. When laying bales on a wall the straws should run horizontally, not vertically otherwise the bales will tend to sink into each other.
 It
is important that the bales be allowed to breathe to prevent accumulation
of moisture and rotting. The bale wall should NOT be placed directly on
a (plastic) dampproof course, this can cause accumulation of moisture at
the bottom of the wall. Instead any moisture should be allowed to leave
the bottom of the wall. An 18" high dry-stone wall base (stem wall)
will do this job very well if you are building on the ground. If you are
building on a platform / stilts a timber base is usually more appropriate.
It
is important that the bales be allowed to breathe to prevent accumulation
of moisture and rotting. The bale wall should NOT be placed directly on
a (plastic) dampproof course, this can cause accumulation of moisture at
the bottom of the wall. Instead any moisture should be allowed to leave
the bottom of the wall. An 18" high dry-stone wall base (stem wall)
will do this job very well if you are building on the ground. If you are
building on a platform / stilts a timber base is usually more appropriate.
Straw bale walls are most commonly rendered. A breathable render can be made from a mix of sand and either lime or clay. A lime render is more durable and hence suitable for exterior use in wet climates. I personally quite like to use lime render inside as well as it is strong and sets quickly without cracking. A clay render can usually be made using local clay soil (better) though it may need sponging over daily for a week or two after application to fill any cracks.
 Either
of these renders can be finished with limewash and / or a natural breathable
paint. I like limewash and breathable emulsion indoors and an annually repeated
limewash outdoors (a very quick job). Note that cement / gypsum render should
not be used as they don't breathe and can lead to accumulation of moisture
in the wall.
Either
of these renders can be finished with limewash and / or a natural breathable
paint. I like limewash and breathable emulsion indoors and an annually repeated
limewash outdoors (a very quick job). Note that cement / gypsum render should
not be used as they don't breathe and can lead to accumulation of moisture
in the wall.
Getting Sculptural with Straw
Re-stringing bales
Where walls end, by doors and windows you will need some half bales. These can easily be made by cutting one string, re-tying the two halfs and then repeating for the other string. care should be taken to keep the bale as tightly tied as possible.
| Tying tips |
|---|
| A generally useful way to tie two strings (or two ends of one string) together tightly is to tie a loop in one. Then pass the other end through the loop and pull it back on itself before tying off. To tighten a bale string that has already been tied, get a short length of stick, put it under the string then pull and twist to tighten. tuck under to finish. |
 Making
Curved Walls
Making
Curved Walls
This is just slightly harder than falling off a log. Take a bale and place one end on a log, another bale or similar support. Apply pressure to the middle of the bale, for this bottom pressure works very well or for a lighter touch you can just kick it a bit.
If you need to get a patrticularly tight curve you can cut the ends of the bale, between (and parellel to) the strings, and remove the straw from behind one string to chamfer the ends. You'll then probably want to tighten theis string a little.
This way works with bends down to 3'-4' inner radius.
Trimming and shaping bales
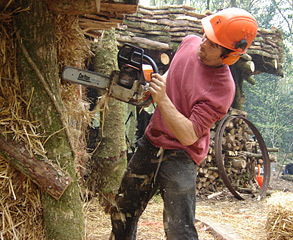 Before
plastering it is advisable and very satisfying to trim the bales. Removing
any loose straws, 'steps' between neighbouring bales and ridges between
folded 'packs' in the bales will all make the plastering process easier
and more economical as well as giving a smoother end result.
Before
plastering it is advisable and very satisfying to trim the bales. Removing
any loose straws, 'steps' between neighbouring bales and ridges between
folded 'packs' in the bales will all make the plastering process easier
and more economical as well as giving a smoother end result.
I have always used a chainsaw for this job. A hedge trimmer would probably work better and garden shears will do the job albeit a bit slower. I have also spoken to people who swear by an angle grinder with metal cutting disc.
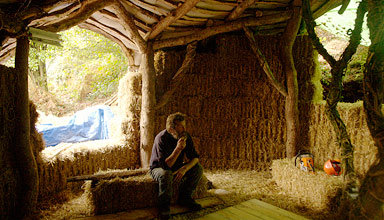
Whilst you're doing this job you can start to get quite sculptural. For example, at windows you can make quite a significant curve (reveal) as in the photo below. Just be careful not to cut the strings!
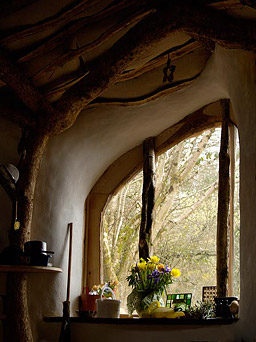 Stuffed
Hessian Shapes
Stuffed
Hessian Shapes
In the photo to the right, the sides of the window were curved off as described above. The plastered form over the window was made using the following method which seemed to work particularly well.
Hessian sacking was stapled, fairly tightly, between the window frame and roof timbers. This was done all across the top of the window on the outside with the top and bottom edges tucked inside. Then from the inside I did the same stapling a foot or so of sack on at a time and stuffing straw in the gap.
When stuffing remove straw carefully from the bale to keep it as tightly packed as possible. At the ends where the form meets the wall simply overlap the hessian by 6" (15cm) or so then plaster over the whole lot.